There are those special moments in the life of a photographer that suddenly change your view on your hobby (or profession). Here are some of the more notable for me:
- getting my first analog SLR (Nikon N2000/F301 in 1988)
- getting my first digital camera (Kodak DC120 in 1997)
- Discovering a software that could stitch together photos into a seamless panorama (MGI PhotoVista 2.0 in 2002)
- Discovering the rather simple instructions on “How to create your own planets”
To make a long story short: The “Polar Panorama Effect” is one of my favourite ways to process photos into unique pieces of art. It takes a panoramic (or at least a landscape-ish) photo and uses the Polar Coordinates filter of Photoshop or The Gimp to create a circular image that seems to wrap the panorama around a planet.
Here are two samples for you to get an idea:
Planet “San Michele, Venice”:

Planet “Manhattan NYC”:

In this article I will share my experiences with this technique, scribble together some things I found out and I will add a couple of links to help you get more out of it.
Selecting a Panorama or Photo for Your Planet
When selecting a photo to start with you should keep the following things in mind:
- Select a panorama photo or a cropped landscape photo (aspect ratio at least 2:1, which means the width should be at least two times the height).
- The bottom area (bottom 25% or so) of the photo in most cases should have only very little detail (e.g. sand, asphalt, water). This area will later be in the middle of the picture and will also be distorted the most.
- The upper area (upper 25%) should also have only little detail, most preferably just one color (e.g. blue sky, night sky etc.).
- The left and the right border of the photo should neatly fit into each other (which is always the case for a stitched 360° panorama).
- The horizon must be exactly horizontal, the left and right end of the photo will be joined together and if they are on different heights your planet will have a big crack in the surface (again this is no issue for 360° panoramas).
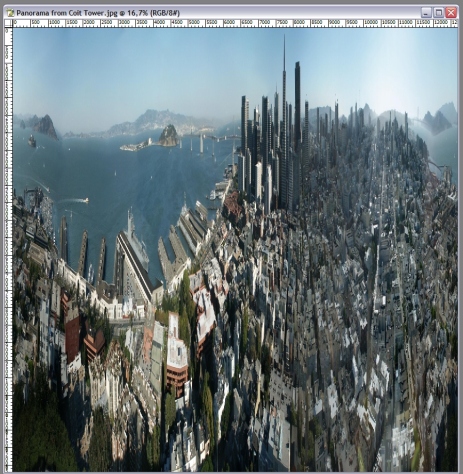
Simple Sample: Planet “San Francisco”
We have the easiest start when we start with a 360° panorama, so let’s take my Panorama shot of San Francisco taken from the Coit Tower:

Step 1: Convert the photo into a square image
Use the Photo|Image Size menu item to change the image size into a large square. Uncheck ‘Constrain Proporties’ and set the “height” value to the same value as your “width” value. You will get a square image:
Step 2: Rotate by 180° and apply the polar effect
Now rotate the photo by 180 degrees…
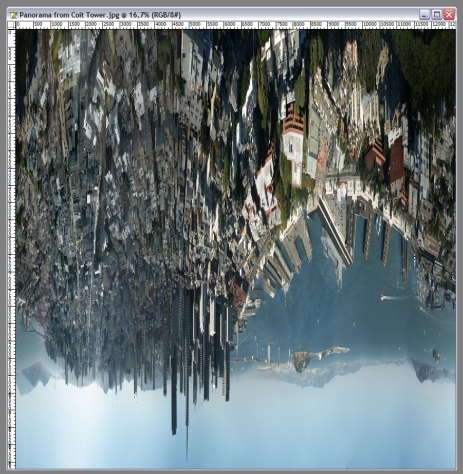
… and apply the “Filter|Distort|Polar Coordinates” filter (choose the “Rectangular to Polar” setting). If you are a user of The Gimp the command is “Filters->Distorts->Polar Coords”.

Well, as you can see that was already most of the magic:

Step 3: Rotate and clean up
The rest is just a little digital darkroom work: Rotate the planet to your liking, filter contrast and colors, clean up the sky and the edges where left and right border of the image came together.

Advanced Sample: Planet “Venice”
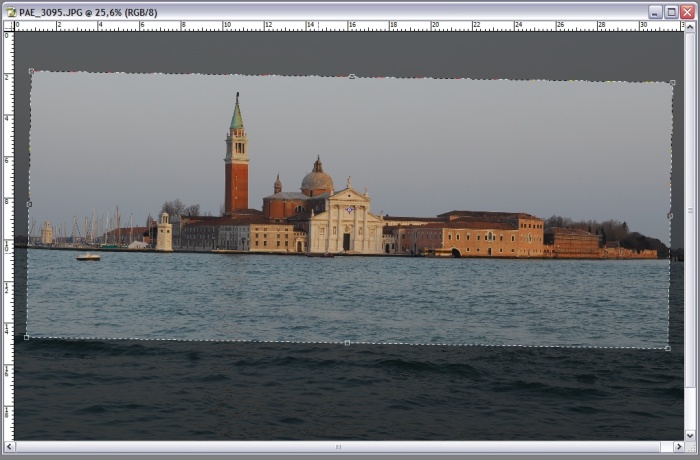
Most of my planets were created using panoramas, but for this second sample we will use the following photo from Venice which shows San Girgio Maggiore Island. Islands are especially good suited for planets because on the left and right edge you only have the horizon to stitch together. This photo fits all the aspects mentioned above.

Step 0: Cropping and Straightening
First we have to crop the image as needed and straighten it to make the horizon absolutely horizontal. Using the cropping tool of PhotoShop we can do both processes in one step:
First we must make sure that our crop window is parallel to the horizon. This image shows how you can do this:
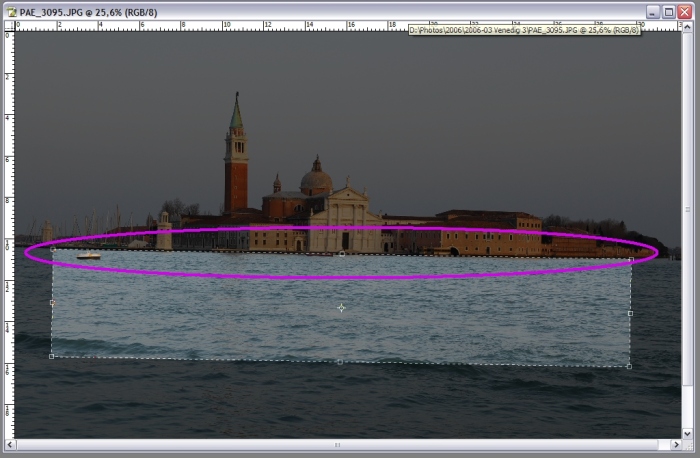
Choose the crop tool of PhotoShop and select a flat rectangular area of the photo. Move the cursor just outside of an edge of the marked area where the cursor changes into two arrows pointing left and up. Click the mouse button and you can rotate the cropped area.
By moving the top border to the horizon of the photo you can exactly inspect the rotation. Move and rotate the crop window until the top border and your horizon is parallel, but don’t activate the crop yet. Good. Now we have a selection that is horizontal.
Now we want to make sure the left and the right border of the image fit together. Using the same trick we now look for areas on the right and the left where the buildings have the same height:
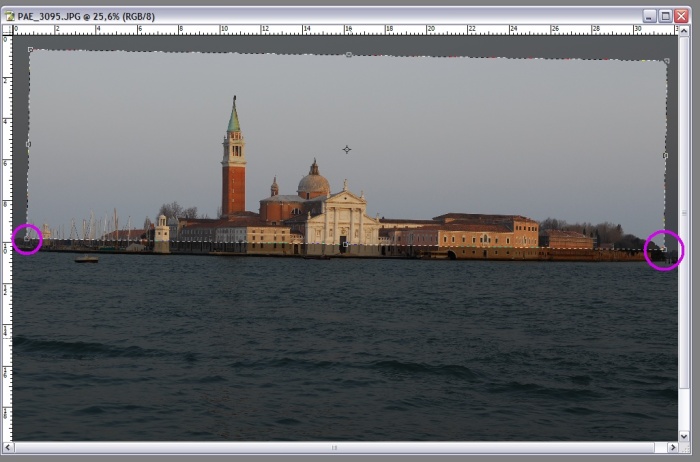
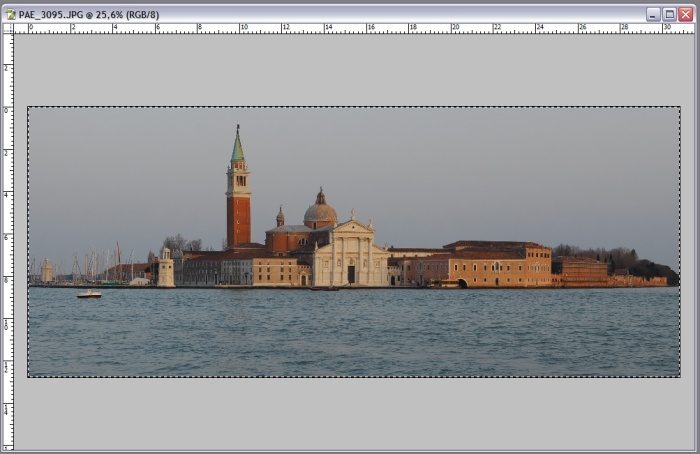
Move the right and left borders as desired. Then finally move the top and bottom border in order to have the waterline roughly in the middle of the cropped photo:
Double click the image and you are ready for the transformation!
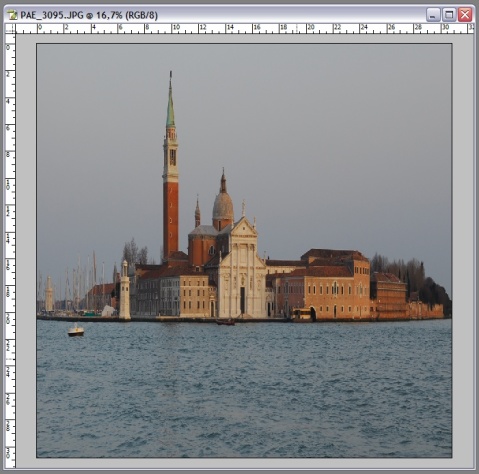
Step 1: Convert the photo into a square image
From here everything works like in the simple sample: Use the Photo|Image Size menu item to change the image size into a large square. Uncheck ‘Constrain Proporties’ and set the “height” value to the same value as your “width” value.
Step 2: Rotate by 180° and apply the polar effect
Now rotate the photo by 180 degrees and apply the “Filter|Distort|Polar Coordinates” filter (choose the “Rectangular to Polar” setting). If you are a user of The Gimp the command is “Filters->Distorts->Polar Coords”.
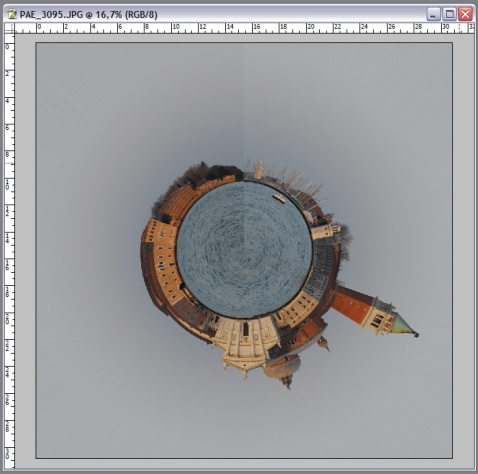
Step 3: Rotate and clean up
Again, the rest is just a little digital darkroom work. Here are the things I did with this image:
- Use the copy-brush to hide the stitch borders
- Rotate the photo to my liking
- The usual photo editing of histograms curves, contrast and color
The final result could then look like this:

Want more samples?!
| Source Panorama | Polar Panorama |
|
|
 |
 |
|
 |
 |
|
 |
 |
More on my Make Your Own Planets photo set on flickr.
What’s next?
Want to do more with this technique? Here are some suggestions:
- Upload your images to flickr and add them to the “Create your own planets” group
- For some panoramas leaving away the 180° rotation creates nice images like this images shows:

The source panorama (360°) can be seen here
Flickr user “Seb Przd” has experimented with other projections for his panoramas, this could be an interesting way to go on
Software I use
To create my panoramas I usually take the photos without a tripod and use AutoStitch (freeware) and PanoramaFactory (shareware $30) for the digital work.
Update November 2018: Today I am using Photoshop and Autopano Giga (which has unfortunately been discontinued) to stitch the panoramas.
The Flexify filter module ($35) for Adobe PhotoShop creates polar panoramas on-the-fly and offers numerous projections for your photos.
Update November 2018: The app Tiny Planets for iOS creates Tiny Planets very easily.
About the author
Dirk Paessler is hooked on photography since 1983. Have a look at his photoblog. When he is not taking photos he is the founder and chairman of Paessler, a software company creating network monitoring software.
Notes
This article was initially published on the PhotoJoJo Newsletter.

thank you for this! very interested in this technique so now will try as soon as i have time/ 360 shots. keep up the good work!
It was working quite well until rotate the image 180º. In PS CS5 the option Filter>Distort is inactive. What is the way to unlock it? What I did wrong?
Thnks
i also wana know.
unlock your layer
Hi,
im having trouble using the distort function under the filters. whatelse can i do? it doesnt give it to me as an option
you have to flatten your image, first.
I just love these, and here is the question- to make a pan photo, I stand in one place and spin around taking photos all around (360 degrees) and then stitch them and then start the
process of sizing… I tried just one photo and of course the sides do not match up…
Try using Photoshop File>Automate>Photomerge
and load two or more images you would like to use for your pan. Make sure your images overlap so to speak so photoshop knows what to do with them. also if taking pictures of people its best to use a Tripod and take 2 or 3 separate pans. go around once then do it again 2 more times. it sometimes cuts people in half.
nice i like